
The Perfect Chocolate Raspberry Cake Recipe: A Baker’s Step-by-Step Guide
The chocolate raspberry cake recipe I’m sharing today undoubtedly creates one of the most indulgent desserts you’ll ever taste. This super moist, perfectly chocolatey cake paired with homemade raspberry filling is a combination that never fails to impress.
When I first started making this chocolate cake with raspberry filling, I was amazed at how versatile it actually is. You can transform this same recipe into 24 cupcakes, a sheet cake, a three-layer 6-inch cake, or even a bundt cake. The raspberry chocolate cake recipe we’ll explore features three layers of rich chocolate sponge with a silky buttercream and that vibrant homemade raspberry filling. What I love specifically about this chocolate raspberry layer cake is how the delicate taste of raspberries balances perfectly with the deep chocolate flavors without either one overpowering the other.
In this step-by-step guide, I’ll walk you through creating each component of this showstopping dessert, from the ultra-moist cake layers to the luscious chocolate frosting and that next-level raspberry filling that makes this cake truly special.
Essential Ingredients for a Chocolate Raspberry Layer Cake
Creating a mouthwatering chocolate raspberry layer cake starts with gathering the perfect ingredients. The quality of these components significantly influences the final taste and texture of your cake. Let’s explore what you’ll need for each element of this decadent dessert.
Dry ingredients for the cake base
The foundation of your chocolate raspberry cake requires precise measurements of dry ingredients. All-purpose flour forms the structure, while adding 2 teaspoons of cornstarch to the flour creates a lighter texture similar to cake flour. For the chocolate flavor, you’ll need 3/4 cup of high-quality unsweetened cocoa powder. I recommend using a combination of natural and Dutch-processed cocoa for the perfect balance of flavor and texture.
Both baking powder (1 1/2 teaspoons) and baking soda (1 1/2 teaspoons) are crucial for proper leavening. Additionally, 1 cup of mini semi-sweet chocolate chips tossed in 1 tablespoon of flour prevents them from sinking to the bottom of the cake. The sugar component typically includes 1 3/4 cups granulated sugar, though some recipes incorporate brown sugar for added moisture.
Wet ingredients and flavor enhancers
For the wet ingredients, you’ll need 1/2 cup vegetable oil (or melted coconut oil) which keeps the cake incredibly moist. Furthermore, 3/4 cup full-fat sour cream and 1/2 cup buttermilk contribute to the cake’s tender crumb. Two large eggs at room temperature provide structure.
Surprisingly, 1/2 cup of hot coffee or hot water is essential – it awakens the chocolate flavor by helping the cocoa powder bloom. Don’t worry though, the coffee won’t make your cake taste like a morning brew! For deeper chocolate notes, 2 teaspoons of espresso powder works wonders. As one expert notes, “Espresso powder is chocolate’s best friend”.
Other flavor enhancers worth considering include a sprinkle of sea salt for contrast or a dash of white pepper to elevate the chocolate flavor.
Raspberry filling essentials
The vibrant raspberry filling requires 3 cups of fresh or frozen raspberries. If using frozen, there’s no need to thaw them first. To thicken this filling properly, you’ll need 1 1/2 tablespoons cornstarch dissolved in 1 1/2 tablespoons water to create a slurry.
About 1/3 cup granulated sugar balances the tartness of the berries without making the filling too sweet. Meanwhile, 1 teaspoon of lemon juice adds brightness and 1/2 teaspoon vanilla extract rounds out the flavor profile.
Buttercream and ganache components
For a luxurious chocolate buttercream, gather 1 cup of room temperature unsalted butter, 3 1/2 cups confectioners’ sugar, and 1/2 cup cocoa powder. Three tablespoons of heavy cream create the perfect consistency.
If you prefer a ganache finish, you’ll need 8 ounces of quality semi-sweet or bittersweet chocolate finely chopped, combined with 3/4 cup heavy cream. Some bakers add 1/4 cup raspberry liqueur to the ganache for an extra layer of flavor.
Gathering these ingredients before beginning ensures your baking process will be smooth and enjoyable.
Step-by-Step: Baking the Chocolate Cake Layers
Now that we have our ingredients ready, let’s begin the baking process for our chocolate raspberry layer cake. The quality of your cake layers will determine the foundation of this delectable dessert.
Preparing your pans and oven
Success in baking begins with proper preparation. First, preheat your oven to 350°F (177°C). This temperature creates the perfect environment for chocolate cake development.
For the pans, I recommend using two 9-inch round cake pans. To prevent sticking, you’ll need to prepare them thoroughly. The most effective method is a three-step approach: spray the pans with nonstick baking spray (Baker’s Joy works beautifully), line with parchment paper rounds, then spray again. This combination is more reliable than either method alone.
To create perfect parchment circles, simply place the empty pan on parchment paper, trace around it, and cut out the shape. This extra step ensures your cakes will release flawlessly after baking.
Mixing the batter correctly
In a large bowl, whisk together all dry ingredients: flour, cocoa powder, sugar, baking soda, baking powder, and salt. Set this mixture aside momentarily.
In a separate bowl, combine the wet ingredients. Using a stand mixer or handheld mixer with a whisk attachment makes this process easier. Mix oil, eggs, and vanilla together on medium-high speed until combined, subsequently add buttermilk and mix thoroughly.
The crucial step comes next – pour the wet ingredients into the dry ingredients, add hot water or coffee, and whisk on low speed until completely combined. Don’t be alarmed that the batter appears quite thin – this is precisely how it should be. For chocolate raspberry layer cake perfection, ensure no dry pockets remain.
Baking and cooling the layers
Divide the batter evenly between your prepared pans. For absolute precision, use a kitchen scale. The cakes will need approximately 23-26 minutes in the oven. Baking times may vary based on your specific oven, hence keep a close eye on them.
To test doneness, insert a toothpick into the center – it should come out clean or with just a few moist crumbs. Interestingly, even perfectly baked chocolate cakes may slightly sink in the center due to cocoa powder’s structure.
Once baked, place the pans on a wire rack for initial cooling. Allow them to cool in the pans for about 10 minutes. This brief period helps the cakes set properly. Then, run an offset spatula around the edges to loosen and carefully remove from the pans to cool completely on wire racks.
Making the Raspberry Filling and Chocolate Buttercream
With our cake layers baked and cooling, let’s focus on what makes this chocolate raspberry layer cake truly exceptional—the homemade filling and buttercream. These components elevate an ordinary chocolate cake into a memorable dessert experience.
How to make raspberry filling from fresh or frozen berries
Both fresh and frozen raspberries work beautifully for this filling, though frozen berries are often more cost-effective and consistently sweet. First, combine raspberries and sugar in a medium saucepan over medium heat. Once bubbling, reduce the mixture for 15-20 minutes. Next, create a cornstarch slurry by mixing 2 tablespoons of cornstarch with water. Add this slurry to your raspberry mixture, stirring constantly until thickened. The addition of 1 teaspoon of lemon juice provides essential brightness while a splash of vanilla extract rounds out the flavor profile.
For an elevated version, consider adding 2 tablespoons of raspberry liqueur like Razzmatazz by DeKuyper after cooling. This optional ingredient adds that “something special” quality without overwhelming the natural raspberry flavor.
Tips for a smooth, seedless filling
Indeed, a seedless filling is crucial for wedding cakes and special occasions—nobody wants seeds stuck in their teeth during celebrations. To achieve this, press the cooked raspberry mixture through a fine mesh strainer using a spoon or rubber spatula. This process takes time and patience, but yields a silky-smooth result worth the effort.
An efficient technique involves straining enough pulp to get between 1/3-1/2 cup, continuously stirring and pressing to extract maximum juice while leaving seeds behind. Moreover, this straining step should happen after cooking but before adding the cornstarch mixture for best results.
Whipping up chocolate buttercream with real chocolate
For the perfect chocolate buttercream, start with 1½ cups room-temperature unsalted butter whipped until pale and fluffy—about 5 minutes. Afterward, add 4 cups confectioners’ sugar and ¾ cup cocoa powder. Incorporate 4 tablespoons of heavy cream one tablespoon at a time.
In contrast to cocoa-only frostings, using real melted chocolate creates a richer, smoother texture. For this method, cream butter until light, gradually add powdered sugar, then fold in room-temperature melted chocolate. Of course, scrape down the bowl several times during mixing to ensure even color without streaks.
This frosting pairs perfectly with our raspberry filling, creating that ideal balance between sweet chocolate and tart berries.
Assembling and Decorating the Cake Like a Pro
The assembly phase is where your chocolate raspberry layer cake transforms from separate components into a showstopping dessert. This crucial stage requires patience and attention to detail, ultimately determining how professional your finished cake will appear.
Leveling and stacking the cake layers
Initially, ensure your cakes are completely cooled before assembly. For perfectly flat layers, use a large serrated knife to remove any domes from the tops. Place your first cake layer on a cake board or serving plate. Some professional bakers recommend placing the cake bottom-side-up for a perfectly level surface with minimal exposed crumbs. To prevent your cake from sliding during decoration, secure it with a small dab of buttercream between the cake board and bottom layer.
Creating a buttercream dam for the filling
Prior to adding the raspberry filling, pipe a thick border of chocolate buttercream around the edge of each layer. This “dam” serves as a crucial barrier that prevents your raspberry filling from seeping out and creating messy sides. Fill a piping bag with buttercream using a large round tip (I use Wilton 2A) or simply cut about ¾ inch off the tip of a disposable bag. Pipe approximately ¼ inch from the edge of the cake layer.
Applying a crumb coat and final frosting
After stacking all layers with filling, apply a thin layer of buttercream all over the cake—this is your crumb coat. Essentially, this initial layer traps loose crumbs, ensuring your final frosting layer remains clean. Refrigerate the crumb-coated cake for at least 30 minutes. Following refrigeration, apply your final layer of frosting, using an offset spatula or bench scraper to achieve a smooth finish.
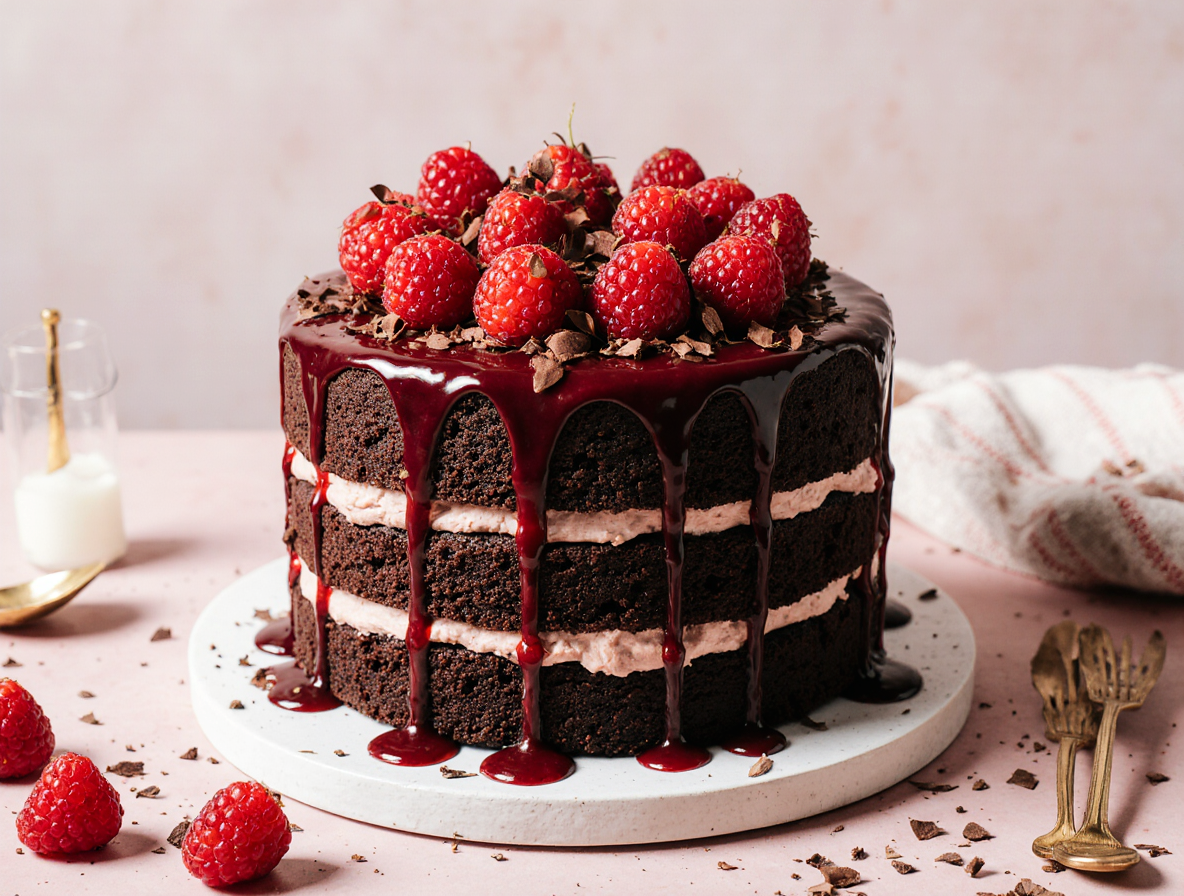
Adding a chocolate ganache drip
For an elegant chocolate ganache drip, combine heavy cream and chocolate chips. Bring cream to a boil, pour over chocolate, wait 5 minutes, then stir until smooth. Allow the ganache to cool for approximately 15 minutes. Test a single drip on the cake’s edge to check consistency before applying around the entire perimeter. The perfect ganache should flow slowly down the sides without running all the way to the bottom.
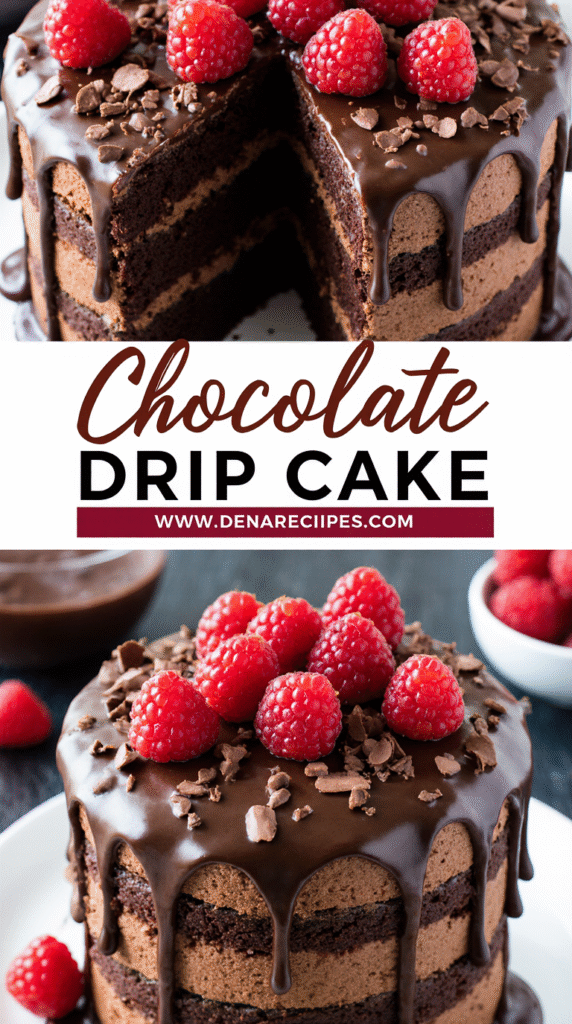
Decorating with fresh raspberries and chocolate chips
Finally, embellish your chocolate raspberry cake with fresh raspberries on top. For added dimension, pipe small rosettes of remaining buttercream around the cake’s upper edge. Strategically place chocolate chips or shavings between the raspberry decorations for visual contrast and additional texture.
Conclusion
This chocolate raspberry cake recipe certainly stands as one of my favorite desserts to both make and serve. The combination of rich chocolate cake layers with tart raspberry filling creates a perfect balance that delights the senses. Actually, what makes this cake so special is how each element complements the others – the moist cake provides structure, while the raspberry filling adds brightness, and the chocolate buttercream brings everything together with its creamy richness.
Though the process might seem challenging at first, breaking it down into manageable steps makes this showstopping dessert accessible to bakers of all levels. First, you prepare the cake layers with that secret ingredient – hot coffee – to enhance the chocolate flavor. Then, you craft the raspberry filling, deciding whether to leave it naturally textured or strain it for an elegant, seedless version. Finally, you assemble everything with professional techniques like creating a buttercream dam and applying a crumb coat.
Remember that practice makes perfect. My first attempt at this cake years ago looked nothing like the polished version I make today. Additionally, don’t hesitate to put your own spin on the decorations – perhaps using white chocolate shavings instead of dark, or arranging the raspberries in a different pattern.
This cake works wonderfully for special occasions such as birthdays, anniversaries, or holiday gatherings. Undoubtedly, your friends and family will be impressed not only by its stunning appearance but also by its incredible flavor. The next time you need a dessert that truly wows, this chocolate raspberry cake will deliver both visual impact and mouthwatering taste that keeps everyone asking for seconds!
FAQs
Q1. What’s the secret to making a moist chocolate raspberry cake? The key is using the right ingredients and techniques. Incorporate vegetable oil, sour cream, and buttermilk for moisture. Adding hot coffee or water helps bloom the cocoa powder, enhancing the chocolate flavor. Don’t overmix the batter, and be careful not to overbake the cake layers.
Q2. How do you make a smooth, seedless raspberry filling? After cooking the raspberry mixture, press it through a fine mesh strainer using a spoon or rubber spatula. This process takes time but results in a silky-smooth filling. Strain enough pulp to get between 1/3-1/2 cup, continuously stirring and pressing to extract maximum juice while leaving seeds behind.
Q3. What’s the best chocolate to pair with raspberries in this cake? Dark chocolate pairs exceptionally well with raspberries. Its slightly bitter notes complement the sweetness of the berries, creating a balanced flavor profile. For the cake itself, use a combination of natural and Dutch-processed cocoa powder for the perfect balance of flavor and texture.
Q4. Can I use raspberry jam instead of making a filling from scratch? While homemade filling is recommended for the best flavor, you can use raspberry jam as a time-saving alternative. However, homemade filling allows you to control the sweetness and consistency, ensuring it complements the chocolate cake perfectly.
Q5. How do I prevent the raspberry filling from seeping out of the cake layers? Create a “buttercream dam” by piping a thick border of chocolate buttercream around the edge of each cake layer before adding the raspberry filling. This acts as a barrier, keeping the filling in place and preventing it from oozing out when you stack the layers.