
How to Make Deep Fried Cookie Dough: Secret Restaurant Method Revealed

Deep fried cookie dough transforms ordinary cookie dough into crispy, golden balls of HEAVEN that deliver out-of-this-world decadence with every bite. I first encountered this indulgent treat back in 2013 at a food truck in Austin, Texas, and I’ve been obsessed with perfecting the recipe ever since. The contrast between the crunchy exterior and the soft, warm cookie dough center creates an irresistible dessert experience that’s surprisingly achievable at home.
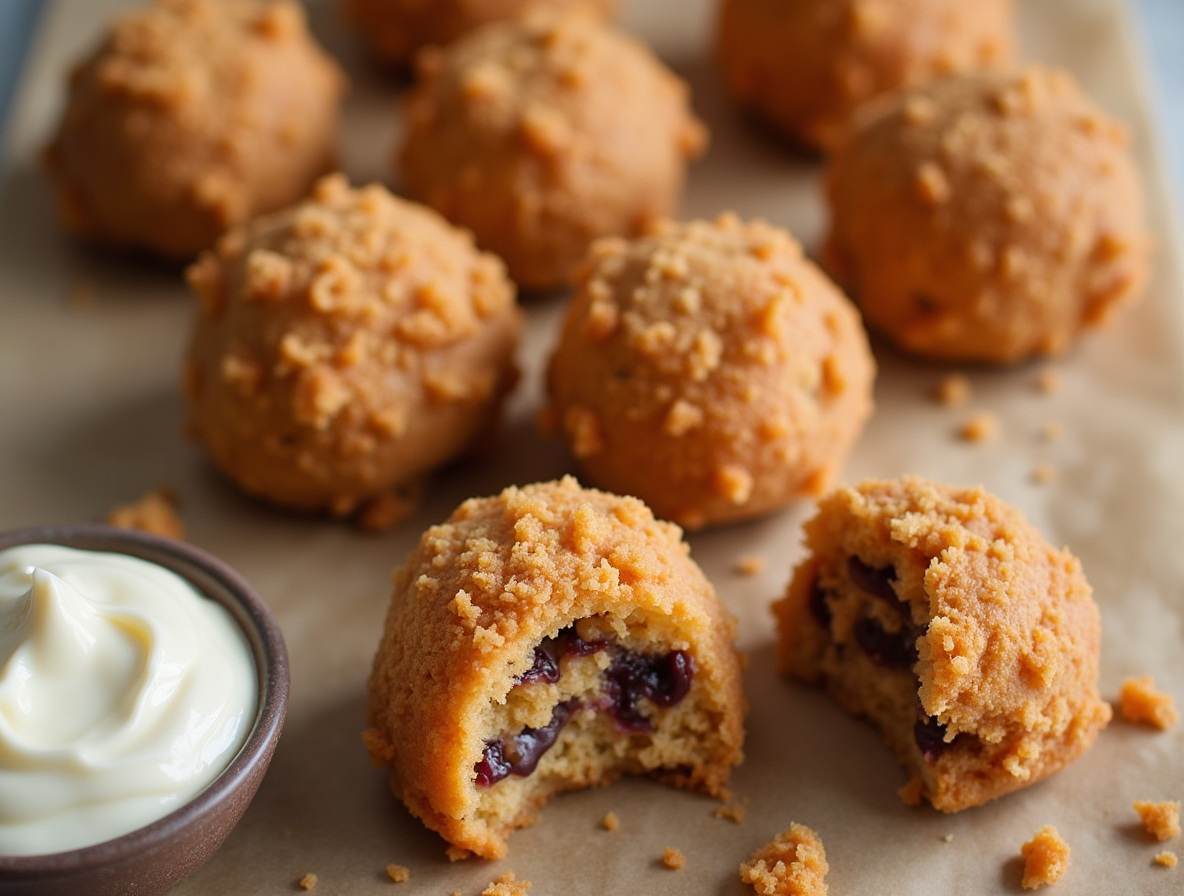
If you’ve ever wondered how to make deep fried cookie dough with that perfect texture, you’re in the right place. Our deep fried cookie dough recipe features a unique cornflake coating that provides a light, crispy layer without overpowering the dough. Additionally, we’ll cover crucial techniques like heat-treating flour for safety and maintaining the ideal oil temperature between 360°F and 370°F. With just 45 minutes of preparation and cooking time, you can create 14-16 shareable dessert balls that are best served warm with a dusting of powdered sugar or a drizzle of chocolate syrup.
Choosing the Right Cookie Dough
The foundation of exceptional deep fried cookie dough begins with selecting the right dough. This critical choice affects everything from safety to flavor—making it worth a bit of extra attention before heating that oil.
Homemade vs. store-bought dough
When it comes to deep fried cookie dough, both homemade and store-bought options can work wonderfully. I prefer homemade dough for its superior flavor and customization options. However, if you’re short on time, store-bought cookie dough works perfectly fine for this recipe. Many readers have reported successful results with pre-made dough. The key difference is that homemade dough gives you complete control over ingredients and safety considerations—particularly important since the dough won’t fully cook during frying.
How to make edible cookie dough safe
Because deep fried cookie dough remains partially raw in the center, safety is paramount. There are two main concerns to address:
First, raw flour can harbor harmful bacteria like E. coli. To make it safe, heat-treat your flour by baking it at 350°F for 10 minutes until it reaches 160°F. This simple step eliminates potential pathogens without affecting flavor.
Second, raw eggs pose a salmonella risk. You have three excellent options:
- Use pasteurized eggs, which are safe to consume raw
- Substitute the egg with 3 tablespoons of milk for an egg-free version
- Follow an entirely egg-free cookie dough recipe designed for safe consumption
Remember that even with the frying process, the inner dough doesn’t reach temperatures high enough to fully cook eggs or flour, therefore these precautions are essential, not optional.
Why chilling the dough matters
Chilling your cookie dough isn’t just a suggestion—it’s crucial for successful deep frying. When you refrigerate cookie dough, several important changes occur:
First, the fats solidify, which helps the dough balls maintain their shape during frying rather than dissolving in hot oil. Moreover, chilling allows the flour to absorb moisture from the wet ingredients, concentrating flavors and creating a better texture.
The ideal chilling time is between 1-24 hours before frying. This resting period transforms your dough, making it firmer and easier to handle. Furthermore, chilled dough develops a richer, more complex flavor profile as some flour components break down into simpler sugars. Consequently, you’ll get a better-tasting final product with that restaurant-quality depth of flavor.
Making the Perfect Deep Fried Cookie Dough Batter
Creating the perfect coating for deep fried cookie dough requires a balanced batter that puffs up beautifully while protecting the precious dough inside. The right batter makes all the difference between soggy disappointments and restaurant-quality treats.
Basic batter ingredients
The classic batter for deep fried cookie dough consists of a few simple pantry staples. For a traditional flour-based batter, you’ll need:
- 1-1¼ cups all-purpose flour
- 1 teaspoon baking powder
- ¼ teaspoon salt
- ¼ cup granulated sugar
- 1 cup milk (plus 2 tablespoons for proper consistency)
- 2 teaspoons vegetable oil
First, whisk together all dry ingredients thoroughly in a medium bowl, then add the milk and oil. Continue whisking until your batter is completely smooth and free of lumps. Although the mixture might initially appear thin, don’t worry—it will expand nicely once it hits the hot oil, creating that light yet crispy exterior that perfectly complements the gooey center.
Using pancake mix or flour
While traditional recipes call for flour, many professional kitchens actually use pancake mix as their secret weapon. Pancake mix (like Bisquick) already contains leavening agents and a touch of sweetness, creating a slightly more flavorful coating.
For a pancake mix batter, combine:
- 1½-2 cups pancake mix
- 1 cup milk
- 1 egg (beaten)
- 2 teaspoons vegetable oil
Mix until most lumps disappear, yet be careful not to overmix. Allow the batter to rest for approximately 5 minutes before using—this brief rest period lets the ingredients fully hydrate, resulting in a better texture once fried.
Tips for a light and crispy coating
The key to achieving that restaurant-quality crispy exterior lies in several crucial techniques. Above all, maintain your oil temperature between 360°F-370°F (182°F-188°C). This specific range ensures the batter cooks quickly enough to crisp without burning, while preventing the dough from absorbing excess oil.
When dipping your chilled dough balls, let excess batter drip back into the bowl before placing them in the oil. Otherwise, too much batter creates a heavy, doughy coating rather than the light, crispy shell you’re aiming for.
Work in small batches of 3-4 balls at a time to prevent overcrowding, which would lower the oil temperature. Lastly, for an extra crunchy alternative, some chefs coat the dough in flour first, then dip in batter—this double-layer approach creates an exceptionally crispy exterior while preserving that perfect gooey center.
How to Deep Fry Cookie Dough Safely and Effectively
Now that your dough and batter are prepared, let’s focus on the actual frying process—where safety meets culinary precision. Deep frying cookie dough transforms ordinary treats into golden delights, yet requires careful attention to detail.
Best oils for deep frying
For perfect deep fried cookie dough, select oils with high smoke points. Vegetable oil is the professional choice, with a smoke point between 400°F and 450°F—well above our target frying temperature. This ensures the oil won’t break down or impart off-flavors. Avocado oil is another excellent option, boasting an impressive smoke point of 500°F-520°F and a neutral taste that won’t compete with your cookie dough flavors.
Ideal oil temperature and tools
Maintaining consistent oil temperature is crucial for success. Heat your oil to exactly 360°F-370°F (182°C-188°C) before frying. This specific range ensures your cookie dough cooks properly without burning or becoming greasy. A deep-fry thermometer or candy thermometer is essential for monitoring temperature throughout the process. Dutch ovens make ideal frying vessels as they maintain heat effectively and have high sides to prevent splatters.
How to coat and fry the dough balls
First, ensure your cookie dough balls are thoroughly chilled—ideally frozen for 15-30 minutes. Dip each ball completely in batter, allowing excess to drip off. Instead of using your fingers, use a slotted spoon, skewer, or specialized dipping tool to transfer the battered dough safely into hot oil. For extra stability, some chefs recommend rolling balls in cornstarch before battering.
Working in small batches
Fry only 3-4 balls at once, even if your pot seems spacious. Overcrowding causes the oil temperature to drop dramatically, resulting in soggy, greasy exteriors rather than crispy shells. Between batches, allow the oil to return to the target temperature before adding more dough balls.
Avoiding soggy or undercooked centers
The perfect deep fried cookie dough requires precisely 2-3 minutes of frying time—until the exterior reaches a deep golden brown. Turn the balls occasionally to ensure even cooking. The finished product should have a crispy coating while maintaining a soft, gooey center. Using properly sized balls (about 1½ inches) ensures they cook through without burning the exterior.
Serving, Storing, and Customizing Your Treats
Fresh from the fryer, your golden cookie dough balls deserve special attention to elevate them from merely delicious to absolutely unforgettable. First and foremost, let’s explore how to serve, customize, and store these indulgent treats.
Best toppings and garnishes
The perfect deep fried cookie dough deserves perfect finishing touches. A light dusting of powdered sugar adds elegance and sweetness without overpowering. Equally impressive is a drizzle of melted chocolate—either milk or white chocolate creates stunning visual appeal. For a complete dessert experience, pair with:
- Vanilla ice cream for temperature contrast
- Fresh whipped cream for lightness
- Strawberry sauce for fruity brightness
- Salted caramel sauce for sophisticated sweetness
In fact, many restaurants serve their deep fried cookie dough with multiple toppings, creating an impressive dessert platter that’s perfect for sharing.
Creative flavor variations
Beyond classic chocolate chip, the possibilities for deep fried cookie dough are virtually endless. Substitute some butter with peanut butter for a nutty twist. Add pecans for delightful crunch. Experiment with white chocolate chips or colorful sprinkles for visual appeal.
Certainly more adventurous bakers might try cookie dough variations like funfetti birthday cake, cookies & cream, or candy-inspired flavors such as Twix or Snickers. Each variation can be deep fried using the same batter technique, creating a customized dessert menu worthy of any restaurant.
How long do they stay fresh?
These treats are undeniably best served immediately while warm. Given their unique composition, leftover deep fried cookie dough balls can be stored in an airtight container at room temperature for up to 2 days. For longer storage, refrigerate for up to 5 days, though the texture will gradually deteriorate as the coating becomes soggy.
Make-ahead and reheating tips
Prepare the cookie dough in advance and store in the refrigerator for 1-2 days or freeze for up to 3 months. Subsequently, thaw frozen dough in the refrigerator before frying. To reheat already-fried treats, avoid microwaves as they create sogginess. Instead, use an oven preheated to 375°F for 10-15 minutes on a wire rack, or try an air fryer at 350°F for 5-8 minutes. Alternatively, keep freshly fried balls warm in a 175°F oven until serving time.
Conclusion
Deep fried cookie dough stands out as one of those rare treats that bridges the gap between professional restaurant desserts and achievable home cooking. Throughout this guide, we’ve uncovered several critical techniques that make all the difference between mediocre results and bakery-quality indulgence.
Safety certainly comes first when working with raw dough. Heat-treating flour and addressing egg concerns ensures your delectable treats remain as safe as they are delicious. Additionally, the importance of properly chilled dough cannot be overstated—this simple step prevents melting disasters while developing richer flavors.
The magic truly happens during the frying process. Maintaining that ideal temperature window between 360°F and 370°F transforms ordinary cookie dough into golden treasures with perfectly crisp exteriors and gooey centers. After that, your creativity takes center stage with endless topping and flavor possibilities.
While deep fried cookie dough might seem intimidating at first glance, breaking down the process into manageable steps makes this indulgence surprisingly approachable. The time investment proves minimal compared to the spectacular results—crispy, warm, and utterly irresistible.
Most compelling evidence of this dessert’s appeal? The looks on friends’ faces when they take that first bite. Therefore, gather your ingredients, heat your oil, and prepare for dessert fame. Deep fried cookie dough might have originated in restaurants and food trucks, but now this extraordinary treat belongs in your kitchen too—ready to create memories and satisfy cravings one golden ball at a time.
FAQs
Q1. Is it possible to deep fry cookie dough? Yes, cookie dough can be deep fried. You can use a deep fryer, Dutch oven, or heavy-bottomed pot on the stove to achieve this delicious treat. The key is to maintain the oil temperature between 360°F and 370°F for the best results.
Q2. What are the essential ingredients for deep fried cookie dough? The main ingredients for deep fried cookie dough include cookie dough (homemade or store-bought), flour, baking powder, salt, milk, and vegetable oil for frying. For the batter, you can use either a traditional flour-based mixture or pancake mix for a slightly sweeter coating.
Q3. How do you ensure the safety of deep fried cookie dough? To make deep fried cookie dough safe, heat-treat the flour by baking it at 350°F for 10 minutes. For the eggs, use pasteurized eggs, substitute with milk, or use an egg-free cookie dough recipe. These steps are crucial as the inner dough doesn’t fully cook during frying.
Q4. What’s the ideal frying time for cookie dough balls? The perfect frying time for cookie dough balls is 2-3 minutes, or until the exterior reaches a deep golden brown. It’s important to turn the balls occasionally for even cooking and to achieve a crispy coating while maintaining a soft, gooey center.
Q5. How can you customize deep fried cookie dough? You can customize deep fried cookie dough by experimenting with different cookie dough flavors like peanut butter, funfetti, or cookies & cream. For toppings, try a dusting of powdered sugar, a drizzle of chocolate, or serve with ice cream, whipped cream, or fruit sauces for added variety and flavor.