
The Easiest Frozen S’more Recipe You’ll Ever Make (No Campfire Needed)
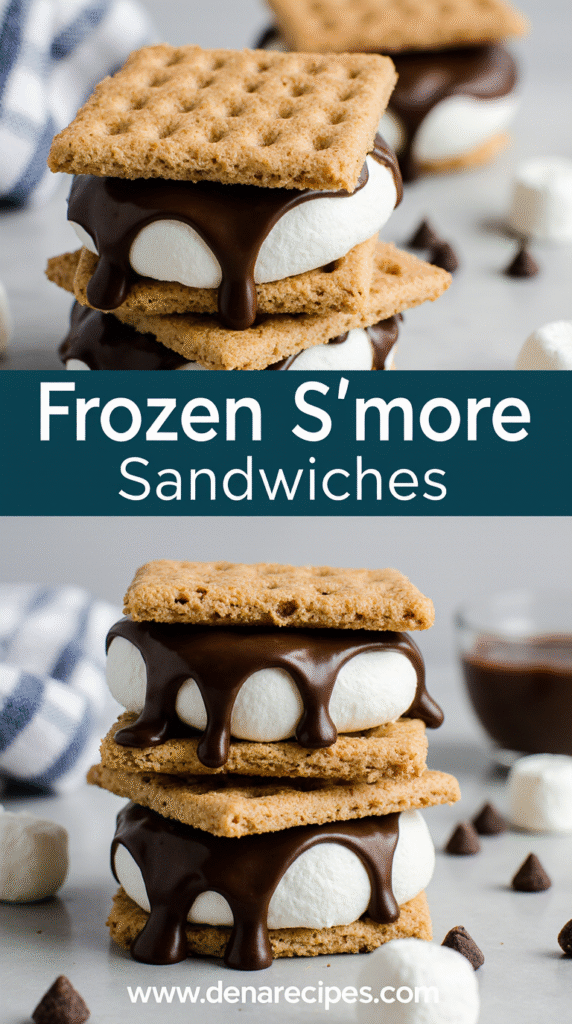
Craving the classic taste of s’mores without the hassle of building a campfire? This frozen s’more recipe transforms the nostalgic treat into a refreshing dessert perfect for hot summer days. These treats really are delicious! The fluffy marshmallow layer and creamy chocolate pudding layer are sandwiched between graham crackers that get slightly soft, like an ice cream sandwich.
Surprisingly easy to prepare, these frozen s’mores bars combine all the key elements of a perfect s’more – gooey toasted marshmallows, crunchy graham crackers, and smooth chocolate – into one delightfully nostalgic frozen dessert. Plus, they’re perfect for summer gatherings and just in time for the 4th of July celebrations! It takes about 20 minutes to put the s’mores together, and then they’ll need to freeze for six hours before cutting and serving. The hardest thing about making these frozen graham cracker sandwiches is waiting for them to set!
What You Need to Make Frozen S’mores
Gathering ingredients for this frozen s’more recipe is the first step to creating a delightful treat that captures all the flavors of traditional campfire s’mores. Unlike traditional s’mores that require open flames, these frozen treats come together with simple pantry staples and refrigerator essentials. Let’s break down everything you’ll need for this no-bake dessert.
Graham crackers
First of all, you’ll need approximately 24 graham cracker squares (12 full sheets broken in half) to create the foundation of your frozen s’mores bars. The graham crackers serve as the perfect crunchy exterior, just like in traditional s’mores. For best results, select regular honey graham crackers rather than cinnamon or chocolate varieties to maintain that classic s’more taste. These crackers will line your pan’s bottom and top, creating a sandwich-like structure that holds all the creamy goodness inside.
Instant chocolate pudding
The chocolate layer of these frozen graham cracker sandwiches comes from instant chocolate pudding mix. You’ll need one 3.9-ounce box of instant chocolate pudding—no cooking required! This provides that rich chocolate flavor that’s essential to any proper s’more. The instant variety works perfectly here because it sets up quickly and maintains its texture when frozen, creating a fudgy chocolate layer that contrasts beautifully with the other components.
Milk and Cool Whip
Additionally, you’ll need 1¾ cups of cold milk to mix with your instant pudding. Using cold milk helps the pudding set properly and create that perfect chocolate layer. For the creamy element, grab an 8-ounce container of Cool Whip (thawed). The Cool Whip gets divided between both the chocolate pudding layer and the marshmallow layer, providing that light, airy texture that makes these frozen s’mores so irresistible. The combination creates a softer texture similar to ice cream when frozen.
Marshmallow creme and cream cheese
Moreover, to create the signature marshmallow flavor without actual toasted marshmallows, you’ll need one 7-ounce jar of marshmallow creme (also called marshmallow fluff). This gives you that gooey marshmallow texture without requiring a campfire. Paired with the marshmallow creme, you’ll need 8 ounces of cream cheese (softened at room temperature). The cream cheese balances the sweetness of the marshmallow creme while adding a pleasant tanginess and helping the layer set properly when frozen. Together, they create a remarkably authentic marshmallow flavor experience.
With these simple ingredients, you’ll transform a classic campfire treat into a refreshing frozen dessert that’s perfect for summer gatherings or any time you’re craving s’mores without the mess.
Step-by-Step: How to Make the Easiest Frozen S’mores
Now let’s dive into the assembly process for these delicious frozen treats! With just a few simple steps, you’ll transform basic ingredients into an irresistible dessert that captures all the flavors of traditional s’mores without any need for a campfire or roasting sticks.
1. Line your pan with parchment paper
First, grab a 9×13-inch baking pan and line it completely with parchment paper. Make sure the paper extends up and over the sides of the pan—this creates “handles” that will help you lift the entire frozen dessert out easily after freezing. This step is crucial since it prevents sticking and makes for clean, even cuts later on.
2. Create the chocolate pudding layer
Next, whisk the instant chocolate pudding mix with 1¾ cups cold milk in a large bowl for about 2 minutes until it begins to thicken. Gently fold in half of the thawed Cool Whip (about 4 ounces) until completely incorporated. This combination creates a light, mousse-like chocolate layer. Spread this mixture evenly over the graham cracker base, making sure to reach all corners of the pan.
3. Mix and spread the marshmallow layer
For the signature marshmallow component, beat the softened cream cheese in a separate bowl until smooth and fluffy. Add the entire jar of marshmallow creme and mix until well combined. Subsequently, fold in the remaining Cool Whip until the mixture is uniform. Carefully spread this marshmallow layer on top of the chocolate pudding layer, smoothing it out with a spatula.
4. Add the top graham cracker layer
Once both creamy layers are in place, arrange the remaining graham crackers on top, creating the final layer of your frozen s’mores sandwich. Press down very gently to ensure the crackers adhere to the marshmallow mixture without pushing too deep.
5. Freeze for at least 6 hours
Finally, cover the entire pan with plastic wrap and place it in the freezer. The dessert needs at least 6 hours to freeze completely, though overnight is ideal for the best texture. Patience is key here—proper freezing ensures clean cuts and the perfect ice cream sandwich-like consistency that makes this frozen s’more recipe so delightful.
Tips for Perfect Frozen Graham Cracker Sandwiches
After assembling your frozen s’mores, a few expert techniques will elevate them from good to extraordinary. These professional tips ensure your frozen graham cracker sandwiches look as impressive as they taste.
Use square-edged pans for cleaner cuts
Opt for a 9×13 pan with square edges instead of rounded corners when preparing your frozen s’more recipe. Square-edged pans allow you to fit more graham crackers—15 halves instead of just 12—creating more servings from a single batch. Furthermore, the straight edges make it easier to align your graham crackers perfectly, resulting in more uniform frozen s’mores bars.
Let sit at room temp before slicing
Patience pays off when cutting frozen s’mores. Remove the pan from the freezer and allow it to sit at room temperature for approximately 10-15 minutes before attempting to slice. This brief thawing period softens the layers just enough to prevent cracking while still maintaining the frozen integrity. Indeed, this waiting period ensures the fudgy chocolate layer has time to soften slightly, making it much easier to achieve clean cuts.
Trim edges for a neater look
For a professional presentation, use a sharp knife to trim any excess filling that may have spread beyond the graham crackers. Specifically, after lifting the entire slab from the pan using the parchment paper “handles,” place it on a cutting board and trim around the outer edges of the graham crackers. This creates perfectly neat squares that look bakery-worthy.
Use a warm knife for clean cuts
Perhaps the most crucial tip: warm your knife before slicing. Dip a long, sharp knife in hot water, then wipe it clean between each cut. Alternatively, you can place a kitchen towel soaked in very hot water under your cutting board to help release the frozen dessert from the bottom. A warm knife glides through the frozen layers smoothly, preventing cracking and creating picture-perfect servings that will impress everyone at your summer gathering.
How to Store and Serve Frozen S’mores Bars
Once you’ve mastered making these delicious frozen treats, proper storage and serving techniques will ensure they maintain their perfect texture and flavor. These simple steps will help you enjoy your frozen s’more recipe for weeks or even months to come.
Store in airtight containers with parchment between layers
After cutting your frozen s’mores bars into individual servings, place them in airtight containers to prevent freezer burn and preserve their fresh taste. Essentially, arrange a sheet of parchment paper between each layer of bars to prevent them from sticking together. This method allows you to easily grab a single bar whenever cravings strike without disturbing the entire batch. For maximum freshness, ensure your container seals completely – any air exposure can lead to texture changes in your frozen graham cracker sandwiches.
Freeze for up to 3 months
Remarkably, these frozen s’mores maintain excellent quality when stored properly. You can keep them in your freezer for up to three months without significant taste or texture degradation. Nevertheless, over time, even well-stored frozen desserts can develop ice crystals. Consequently, for the absolute best experience, try to enjoy your frozen s’mores bars within the first month after making them. Label your containers with the date to keep track of freshness.
Let thaw 10–15 minutes before serving
For the ideal texture, remove your frozen s’mores from the freezer approximately 10-15 minutes before serving. During this brief thawing period, the graham crackers soften slightly while the filling maintains its creamy-yet-frozen consistency. This short wait transforms your s’mores ice cream sandwiches from rock-hard to perfectly spoonable – much like letting ice cream soften briefly before scooping. Above all, resist the temptation to microwave them, as this will ruin the texture.
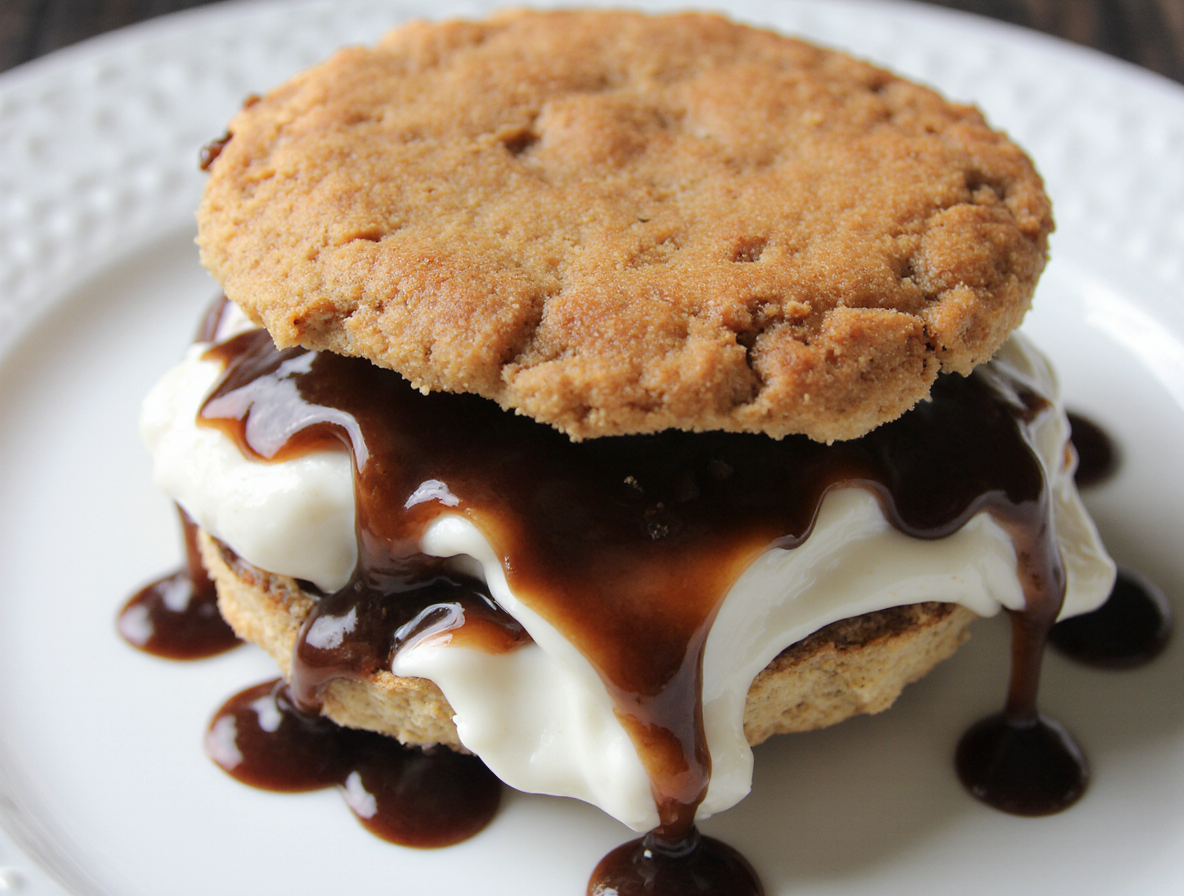
Serve with ice cream or drizzle with chocolate
Elevate your frozen smores recipe by pairing each bar with a scoop of vanilla ice cream for an extra-indulgent dessert. Alternatively, drizzle warm chocolate sauce over the top just before serving – the temperature contrast creates a delightful sensory experience. For summer gatherings, arrange several bars on a serving platter with various toppings like crushed nuts, mini chocolate chips, or caramel sauce for guests to customize their treats.
Conclusion
Frozen s’mores offer the perfect solution for anyone craving that classic campfire treat without the hassle of open flames. These delightful dessert bars capture all the nostalgic flavors we love – crispy graham crackers, rich chocolate, and fluffy marshmallow – while transforming them into a refreshing frozen treat. Additionally, their make-ahead nature makes them ideal for summer gatherings, family reunions, or just satisfying late-night cravings.
What makes this recipe truly stand out is its simplicity. Rather than dealing with sticky marshmallows and melting chocolate, you’ll create something equally delicious with minimal effort. Subsequently, your patience during the freezing process rewards you with a dessert that’s sure to impress friends and family alike.
The versatility of these frozen s’mores bars cannot be overstated. You can enjoy them plain, dress them up with toppings, or serve them alongside other summer desserts. Undoubtedly, their long freezer life ensures you’ll always have a sweet treat ready whenever the mood strikes.
We believe this recipe deserves a permanent spot in your dessert rotation. The next time you’re tempted to build a campfire just for s’mores, remember this easier alternative waiting in your freezer. Your taste buds will thank you for the familiar flavors, while your schedule will appreciate the convenience. Give these frozen s’mores a try – they might just become your new favorite way to enjoy this classic combination!
FAQs
Q1. Can I make s’mores without a campfire? Yes, you can! This frozen s’mores recipe is a perfect alternative that doesn’t require a campfire. It combines graham crackers, chocolate pudding, and a marshmallow cream mixture to create a delicious frozen treat with all the classic s’mores flavors.
Q2. How long do I need to freeze the s’mores? The frozen s’mores need to be in the freezer for at least 6 hours, but freezing them overnight is ideal for the best texture. This ensures that all layers are properly set and will hold together when cut and served.
Q3. How should I store the frozen s’mores? Store the cut s’mores bars in airtight containers with parchment paper between layers to prevent sticking. They can be kept in the freezer for up to 3 months, but are best enjoyed within the first month for optimal freshness.
Q4. What’s the best way to serve frozen s’mores? For the ideal texture, remove the frozen s’mores from the freezer about 10-15 minutes before serving. This allows them to soften slightly. You can serve them as is, or elevate them by adding a scoop of ice cream or drizzling with warm chocolate sauce.
Q5. Can I customize the frozen s’mores recipe? While the recipe provides a classic s’mores flavor, you can certainly customize it. Try using different flavors of instant pudding, adding crushed nuts or mini chocolate chips between layers, or experimenting with various toppings when serving to create your own unique frozen s’mores experience.